
How Moroccan Zellige Is Made: The Complete Step-by-Step Process
TRADITIONAL MOROCCAN CRAFTS
The Complete Step-by-Step Process
From Fes clay and traditional kilns to hand-cut geometry and face-down mosaic assembly—discover the people, materials and skills behind Morocco’s celebrated tilework.
IN THIS GUIDE
How Moroccan zellige is made
- What is Moroccan zellige?
- Why Fes is important to zellige craftsmanship
- The process at a glance
- The complete zellige-making process
- Who makes Moroccan zellige?
- What makes authentic Moroccan zellige unique?
- Handmade zellige vs machine-made tile
- Can visitors make zellige in Fes?
- Frequently asked questions about Moroccan zellige
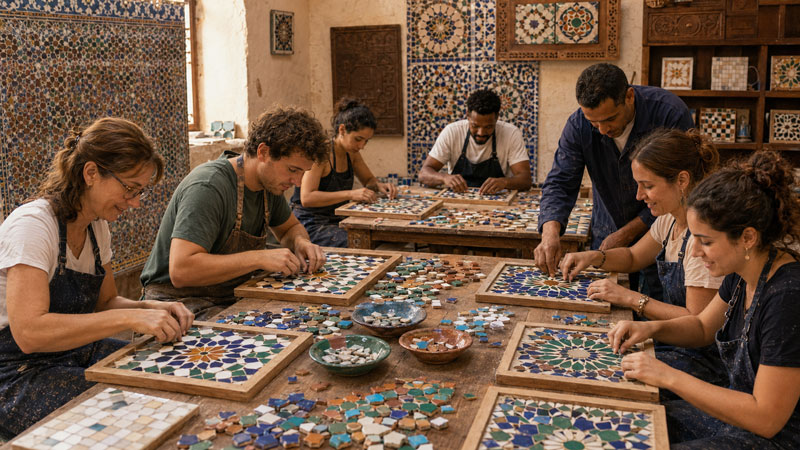
Inside a traditional zellige workshop in Fes, the craft announces itself through sound. Clay is pressed and turned, kiln doors open onto waves of heat, and a sharp metal hammer taps against glazed tile. On another work surface, dozens of small stars, crosses, diamonds and triangles wait to become part of a pattern that may eventually cover a fountain, courtyard or riad wall.
The finished mosaic can appear perfectly ordered, but its creation is deeply human. Each tile passes through several hands. It is shaped, dried, fired, glazed, fired again, marked, cut, refined and finally assembled into a larger composition. Small variations in colour and texture are not accidental decorations added at the end; they are records of clay, flame, glaze and handwork.
QUICK ANSWER
Moroccan zellige is made by preparing natural clay, shaping and drying tiles, firing them, applying coloured glaze, firing them again, cutting each tile into geometric pieces by hand and assembling those pieces into a mosaic pattern.
What is Moroccan zellige?
Inside a traditional zellige workshop in Fes, the craft announces itself through sound. Clay is pressed and turned, kiln doors open onto waves of heat, and a sharp metal hammer taps against glazed tile. On another work surface, dozens of small stars, crosses, diamonds and triangles wait to become part of a pattern that may eventually cover a fountain, courtyard or riad wall.
The finished mosaic can appear perfectly ordered, but its creation is deeply human. Each tile passes through several hands. It is shaped, dried, fired, glazed, fired again, marked, cut, refined and finally assembled into a larger composition. Small variations in colour and texture are not accidental decorations added at the end; they are records of clay, flame, glaze and handwork.
QUICK ANSWER
Moroccan zellige is made by preparing natural clay, shaping and drying tiles, firing them, applying coloured glaze, firing them again, cutting each tile into geometric pieces by hand and assembling those pieces into a mosaic pattern.
Zellige is a traditional Moroccan architectural craft made from glazed clay. The term can describe individual handmade tiles, but it is especially associated with geometric mosaics created from many small hand-cut pieces. These pieces are arranged according to repeating systems of proportion, symmetry and colour, transforming a simple ceramic surface into a structured field of pattern.
Traditional zellige appears in fountains, courtyards, floors, columns, doorways, hammams, mosques, madrasas and palaces. It also continues to evolve in contemporary interiors, where handmade square tiles and geometric mosaics are used in kitchens, bathrooms, hotels and public spaces.
Is zellige a tile or a mosaic?
It can be both. A square glazed clay tile may be installed as an individual surface tile. For traditional geometric zellige, however, glazed tiles are cut into smaller tesserae – stars, triangles, diamonds, crosses and other forms – then combined into a larger mosaic. Understanding this distinction helps explain why authentic mosaic work requires much more than simply producing ceramic squares.
Why Fes is important to zellige craftsmanship
Fes is one of Morocco’s most important centres of traditional ceramics and architectural decoration. Its historic medina preserves a living relationship between workshops, artisans and buildings that have used these techniques for centuries. UNESCO describes the Medina of Fes as a place where local knowledge and skills are interwoven with diverse cultural influences and continue to be transmitted as part of the city’s living heritage.
Zellige is also produced and practised elsewhere in Morocco, including cities such as Meknes, Rabat and Marrakech. Fes nevertheless remains a powerful reference point because of its clay traditions, artisan networks, historic monuments and continuing workshop culture.
The process at a glance
- Select and prepare suitable clay.
- Remove stones and other impurities.
- Shape the clay into flat tiles.
- Dry the raw tiles gradually.
- Fire the unglazed tiles.
- Apply coloured glaze by hand.
- Fire the glazed tiles again.
- Sort and inspect the finished tiles.
- Plan the geometric pattern and required shapes.
- Mark, cut and refine every mosaic piece.
- Arrange the pieces face-down.
- Secure, install and finish the mosaic.
IMPORTANT
Exact methods, firing sequences, tools and workshop terminology can vary. The sequence below describes a widely documented traditional process rather than a single universal recipe.
The complete zellige-making process
Step 1: Selecting the clay
Zellige begins with clay whose mineral composition, plasticity and firing behaviour make it suitable for ceramic work. Clay traditionally associated with the Fes region is valued for the body it develops after firing, but artisans must still judge each batch. Raw earth can contain stones, roots and inconsistent pockets that would weaken the finished tile.
Material selection influences almost every later stage. Clay that shrinks unpredictably may warp during drying; clay containing trapped impurities may crack in the kiln; and a poorly prepared surface may react unevenly with glaze.
Step 2: Cleaning and preparing the clay
The clay is mixed with water and worked until it forms a consistent mass. Stones and other unwanted material are removed. The clay is kneaded, pressed or beaten to distribute moisture and reduce trapped air pockets.
This preparation can look simple, but it establishes the tile’s strength. If moisture is uneven or air remains trapped inside, the tile may split during drying or firing. Experienced workers judge readiness through touch, resistance and appearance rather than relying only on a clock.
Step 3: Shaping the clay into tiles
Prepared clay is pressed into flat forms or simple moulds. The artisan controls approximate thickness, levels the surface and removes excess material. Traditional production frequently begins with square tiles, although dimensions and methods vary by workshop and intended use.
Because forming is manual, no two pieces are perfectly identical. Slight differences in thickness, edge and surface become part of the finished character, provided the tiles remain structurally sound and suitable for their purpose.
Step 4: Drying the raw tiles
Freshly formed tiles contain too much water to enter a kiln immediately. They are left to dry gradually in the air or sun and may be turned so that both sides lose moisture more evenly. Weather, humidity, tile thickness and air movement all influence the time required.
Drying too quickly can pull the tile out of shape or create cracks. Firing clay that is still damp can cause breakage. This stage therefore depends on patience and observation, even though no glaze or pattern is visible yet.
Step 5: The first kiln firing
When the tiles are sufficiently dry, they are stacked in a kiln for the first firing. Heat transforms fragile dried clay into a hard, porous ceramic body often called biscuit or bisque. The tiles must then cool before they can be handled safely.
Kiln loading is a specialised task. Heat does not move identically through every part of a traditional kiln, so placement affects the result. The firing must harden the clay without causing excessive distortion, cracking or fusion between pieces.
Step 6: Applying the coloured glaze
The cooled ceramic tiles receive glaze on the surface that will remain visible. Glaze provides colour, depth, shine and a more resistant finish. Traditional palettes commonly include blues, greens, white, ochre, black and earthy red tones, while contemporary workshops may offer a much broader range.
Application is performed by hand. Differences in glaze thickness, absorption and surface texture influence the final appearance. The colour seen before firing may also differ substantially from the colour that emerges from the kiln.
Step 7: The second kiln firing
The glazed tiles return to the kiln. During this firing, heat fuses the glaze to the ceramic body and develops its colour and surface. The position of each tile matters because temperature varies throughout the chamber.
This variation helps produce the tonal movement associated with handmade zellige. Tiles from the same nominal colour batch may emerge lighter, darker, clouded or more saturated. A skilled workshop sorts these differences so they can be blended intentionally rather than appearing as accidental patches.
Step 8: Sorting and quality inspection
After cooling, the tiles are examined for colour, surface finish, cracks, warping, glaze coverage and strength. Some are suitable for individual installation, while others are selected for cutting into mosaic pieces.
Authenticity should not be confused with the absence of quality control. Subtle dimensional and tonal variation is expected; structural cracks, unstable glaze and excessive damage are defects. Good selection preserves the handmade character while removing pieces that could compromise the project.
Step 9: Designing the geometric pattern
Before cutting begins, the final composition must be understood. The master artisan calculates how repeated units will fill the available area and determines the shapes, colours and quantities required. Geometry provides the system that holds the design together.
A small star or cross has meaning within a larger network of relationships. Change one angle or dimension and the surrounding pieces may no longer meet correctly. The artisan therefore combines visual memory, drawing, measurement and practical knowledge of how fired clay behaves.
- Stars and multi-pointed rosettes
- Triangles, diamonds and squares
- Crosses and interlocking polygons
- Borders that frame or transition between patterns
Step 10: Marking the shapes
The required outline is drawn or marked on the glazed tile. Careful placement reduces waste and gives the cutter a clear guide. Traditional workshops may divide this work among specialists, although roles and names vary.
The person who marks a form may be described as a rassam or rasham in transliteration. A cutter may be called a nakkash, while the maalem oversees the complete design and quality. These terms should be presented as workshop vocabulary rather than rigid job descriptions used identically everywhere.
Step 11: Cutting the zellige by hand
Cutting is one of the most recognisable and demanding stages. Using a traditional cutting hammer, often called a menqach, the artisan removes material around the marked shape. A rough form is created first, then the edges are refined until the piece can fit its neighbours.
Glazed ceramic can chip unpredictably. The cutter must strike with enough force to remove material but not so much that the piece splits. Repetition builds speed, yet every strike still requires judgement. Complex patterns may contain hundreds or thousands of pieces whose differences are measured in millimetres.
Step 12: Refining and checking every piece
Newly cut pieces are compared with the required geometry and adjusted where necessary. Edges may be trimmed, a point sharpened or a damaged piece rejected. Components are sorted by colour and shape so the assembler can work efficiently.
This refinement is one reason a finished zellige panel can look precise without looking mechanical. The goal is not to erase every trace of the hand, but to make individual variations cooperate within a coherent pattern.
Step 13: Assembling the pattern face-down
Traditional mosaic pieces are commonly placed glazed-side down on a flat work surface. The artisan sees the unglazed backs while building the design. The visible glazed face remains against the table, helping the finished surface align even when handmade tile bodies vary slightly in height.
The pattern is built from the centre, a guide line or a repeated unit, depending on the design. Spacing, colour sequence and symmetry are checked continuously. At this stage, the artisan must imagine the finished face in reverse.
Step 14: Securing the mosaic
Once the arrangement is complete, it must be stabilised. A backing material can be applied so that the mosaic becomes a transportable panel, particularly for complex repeated work. Other projects may use loose pieces installed directly on site.
There is no single backing method for every zellige project. Workshop practice, panel size, destination, substrate and installer requirements all affect the solution. Large compositions are often divided into manageable sections that are numbered or mapped before delivery.
Step 15: Installation, grouting and final cleaning
Installation begins with a stable, properly prepared surface. Tiles or mosaic sections are positioned carefully so borders align and repeated patterns continue without visible interruption. Joints are filled where required, excess material is cleaned from the glaze and the surface receives a final inspection.
In wet areas, the glazed tile is only one part of the system. Waterproofing must be provided by the substrate preparation, membranes, adhesives, joints and detailing specified for the project. Zellige’s beauty does not replace professional technical installation.
Who makes Moroccan zellige?
A finished zellige mosaic is usually the result of coordinated work. Clay preparers, moulders, kiln workers, glazers, selectors, pattern designers, cutters and assemblers may all contribute. In smaller workshops, one artisan may perform several roles; in larger operations, labour can be highly specialised.
What is a maalem?
A maalem is a master artisan whose knowledge extends beyond a single task. The maalem understands geometry, materials, colour relationships, production constraints and installation requirements. The role also carries responsibility for transmitting knowledge, supervising less experienced workers and protecting the quality of the complete composition.
What makes authentic Moroccan zellige unique?
- A clay body shaped and handled by people rather than an automated line
- Glaze with depth, movement and natural tonal variation
- Edges and surfaces that retain signs of hand production
- Geometric pieces cut and refined individually
- Patterns assembled through artisan judgement and experience
- A direct connection to Moroccan architectural practice
The most convincing installations do not hide variation. They distribute it. Installers often mix tiles from different boxes or batches so light and dark tones move naturally across the surface.
Handmade Zellige vs Machine-Made Tile
Compare authentic handmade Moroccan zellige with industrially manufactured tiles.
| Feature | Handmade Moroccan Zellige | Machine-Made Tile |
|---|---|---|
| Production | Individually shaped and finished by artisans | Mechanically standardised and mass-produced |
| Surface | Tonal movement and natural variations | Highly controlled and uniform appearance |
| Edges | Slightly irregular or individually hand-cut | Consistent, straight and identical |
| Glaze | Variable depth, texture and kiln response | Predictable and consistent factory finish |
| Mosaic Work | Cut, refined and assembled by artisans | Often mesh-mounted, moulded or printed |
| Overall Effect | Organic, individual and responsive to light | Repetitive, regular and visually consistent |
How long does zellige take to make?
There is no responsible universal answer. Production time depends on clay preparation, weather-dependent drying, kiln capacity, firing and cooling cycles, colour selection, the number of shapes, pattern complexity, project size and workshop workload. A field of square tiles can be prepared differently from a custom geometric fountain containing thousands of cut pieces.
When commissioning work, ask the workshop for a project-specific schedule that includes sampling, production, quality review, packing and transport. A very short promise should be evaluated against the number of genuinely manual stages involved.
Can visitors make zellige in Fes?
Yes. A beginner-friendly workshop can introduce the craft without pretending that mastery is achieved in one afternoon. Visitors may learn about clay and glaze, observe a cutting demonstration, choose prepared geometric pieces and assemble a small mosaic under artisan guidance.
For safety, specialised cutting tools may be demonstrated by the artisan or used only with close supervision. Children and beginners often work with pre-cut pieces. The value of the experience lies in understanding the process, meeting craftspeople and completing a personal design – not in rushing through every professional production stage.
EXPERIENCE THE CRAFT
Create your own Moroccan mosaic in Fes
Go beyond seeing zellige on palace walls. Meet local artisans, learn how every piece is shaped and cut, and create your own Moroccan mosaic in a traditional workshop in Fes.
COMMON QUESTIONS
Frequently asked questions about Moroccan zellige
What is Moroccan zellige made from?
Zellige is made from clay formed into tiles, dried, fired, glazed and fired again. For geometric mosaics, the glazed tiles are then cut into smaller shapes and assembled by hand.
Is zellige made entirely by hand?
Traditional production relies heavily on hand preparation, moulding, glazing, sorting, cutting and assembly. Workshops may use practical equipment for some tasks, so methods should be described accurately rather than reduced to a marketing slogan.
Why are zellige tiles uneven?
Small differences result from hand forming, natural drying, kiln position, glaze application and cutting. These variations create character, but structural cracks or unstable finishes should still be rejected during quality control.
How many times is zellige fired?
A common process uses a first firing to harden the clay body and a second firing after glaze is applied. Exact sequences and temperatures vary according to clay, glaze, kiln and workshop practice.
What tool is used to cut zellige?
Artisans traditionally use a specialised cutting hammer often called a menqach. Transliteration and tool form can vary, but skill and controlled striking are essential.
Why is mosaic zellige assembled face-down?
Placing the glazed faces against a flat surface helps align the visible side even when handmade pieces vary slightly in thickness. It also allows the backing to be applied from behind.
What is the difference between zellige and ordinary ceramic tile?
Authentic zellige is characterised by hand production, tonal glaze variation and, in mosaic work, individual cutting and assembly. Factory ceramic tile is engineered for greater dimensional and colour consistency.
Is Moroccan zellige waterproof?
The fired glaze resists water, but a tiled surface is not automatically a waterproof construction. Wet areas require suitable substrate preparation, membranes, adhesives, grout and detailing.
Can zellige be used on floors?
Certain zellige products can be used on floors, but suitability depends on thickness, finish, traffic, slip considerations, installation and maintenance. Confirm requirements with the producer and installer.
Can beginners make a zellige mosaic?
Yes. Introductory workshops often use pre-cut pieces and simplified patterns, allowing participants to learn the design and assembly principles safely under artisan guidance.
Continue exploring traditional crafts in Fes
Meet local artisans and experience Moroccan pottery and zellige through guided, hands-on workshops.
Experience authentic zellige craftsmanship in Fes
Learn from local artisans, understand the geometry and create a personal Moroccan mosaic to take home.